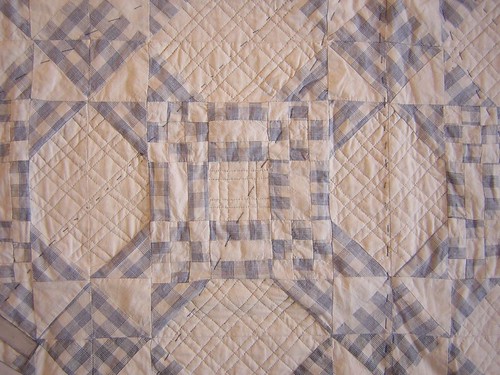
 My quilt is large, 2 x 2 m and I am still determined to do all the quilting by hand. When I took quilting lessons with Ester Miller in Berlin we worked on those wounderful floor-standing scroll quilt frames which I loved but was not willing to spend that much money on. Besides, those frames are like a bulky piece of furniture which I wouldn’t know where to put when I am not working on a quilt.
That’s why I was using a larger hoop frame at first and also tried one of those plastic klip frames a friend gave me. But to be honest once you worked on a large floor-standing quilt frame anything else just doesn’t feel right. And with the technique we learned from Ester Miller you need both hands free for quilting which doesn’t work with frames you have to hold in one hand.
I always thought about the quilting bees in the old days on frames they made themselfs and kept looking for “how-to’s” for a frame that would fit into my appartment. I did not find anything I liked that is when I started to make up my mind about my own version of a two poles floor-standing scroll frame and here it is:
Nachdem der PDF link meiner deutschen Anleitung verloren gegangen ist hier jetzt in rot einfach die kurze deutsche Übersetzung der Bauanleitung meine IKEA Hacks - Quiltständer / Quiltrahmen.
My quilt is large, 2 x 2 m and I am still determined to do all the quilting by hand. When I took quilting lessons with Ester Miller in Berlin we worked on those wounderful floor-standing scroll quilt frames which I loved but was not willing to spend that much money on. Besides, those frames are like a bulky piece of furniture which I wouldn’t know where to put when I am not working on a quilt.
That’s why I was using a larger hoop frame at first and also tried one of those plastic klip frames a friend gave me. But to be honest once you worked on a large floor-standing quilt frame anything else just doesn’t feel right. And with the technique we learned from Ester Miller you need both hands free for quilting which doesn’t work with frames you have to hold in one hand.
I always thought about the quilting bees in the old days on frames they made themselfs and kept looking for “how-to’s” for a frame that would fit into my appartment. I did not find anything I liked that is when I started to make up my mind about my own version of a two poles floor-standing scroll frame and here it is:
Nachdem der PDF link meiner deutschen Anleitung verloren gegangen ist hier jetzt in rot einfach die kurze deutsche Übersetzung der Bauanleitung meine IKEA Hacks - Quiltständer / Quiltrahmen.
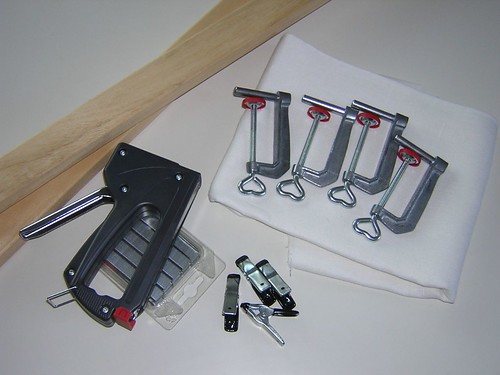
The Material I used is:
- my kitchen table ;-) ( actually it is the table legs
Vika Artur new name is FINNVARD MITTBACK from IKEA which look a little bit like sawhorses but have two seperate top bars for adjusting the hight of your table. Between the two bars you can easily secure the side poles of your quilt frame)
- two wooden poles approx. 30 cm longer than your quilt (you need 15 cm minimum on both ends to hold the poles between the bars of “Artur”, smooth sanded otherwise your quilt fabric might get damaged. In my example I used flat ones but if I’d do is again I would choose round poles.
- 4 screwclamps
- 4 smaller “regular” clamps
- two pieces of 30 – 50 cm long string (I used cotton fabric string)
- two stips of Linen (or any other strong material) a little shorter than the length of your poles, widths 10 cm
- Only tool needed is a tacker with staples long enough to secure the fabric strips on the poles
Das Material, das ich verwendete habe:
-
mein Küchentisch ;-) (eigentlich sind es nur
die Tischbeine
Vika Artur [Ikea hat sie umbenannt, sie heißen jetzt FINNVARD]
von IKEA, die ein wenig wie Sägeböcke aussehen, nur haben sie zwei separate „Balken“ oben mit denen die
Höhe des Tischs eingestellt werden kann. Zwischen den beiden „Balken“ kann man ganz einfach
die Seitenpole des Quiltrahmens befestigen)
- zwei Holzstangen ca. 30 cm länger als der Quilt selbst (es werden mindestens 15 cm
an beiden Enden der Stangen benötigt um sie zwischen den Balken von "
Arthur"
FINNVARD zu befestigen, darauf achten dass das Holz glatt geschliffen
ist sonst könnten sie den Quilt beschädigt. In meinem Beispiel habe ich flache „Stangen“
verwendet, würde aber beim nächsten Mal sicher runde Stangen nehmen
-
4 Schraubzwingen
- 4 kleineren "normalen" Klemmen
- zwei 30 - 50 cm lange Stück Stoffband (ich habe Baumwolleband verwendet)
- zwei Streifen Leinen (oder ein anderes festes Material) etwas kürzer als die Länge der Stangen, Breite ca. 10 cm
- das einzige benötigte Werkzeug, ist ein Tacker mit Klammern die lang genug sind, um die Stoffstreifen an den Polen sicher zu befestigen

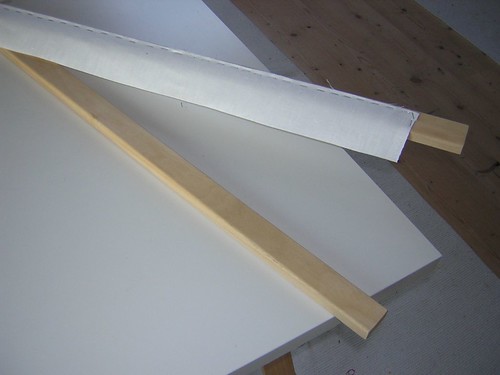
 Tacker the fabric on to the wooden poles.
Befestige die Leinen/Stoffstreifen an den Stangen.
 Now you are ready to attach the quilt to the frame. As my quilt was a work already in progress it was “properly” prepared. The quilting design was marked and the backing, wadding and top where tacked with basting stitches. (
on the website of Cotton Patch you can find a very good description of how to prepare your quilt and they offer the “real frames” too) couldn't find it on that website any longer you will have to google for an instruction)
Jetzt kann der Quilt auf
dem Rahmen/Stangen befestigen werden. Mein Quilt war bereits "richtig"
vorbereitet. Das Quiltmuster hatte ich bereits aufgezeichnet, die Rückseite mit
dem Vlies und dem Quilttop waren bereits sauber zusammen geheftet.
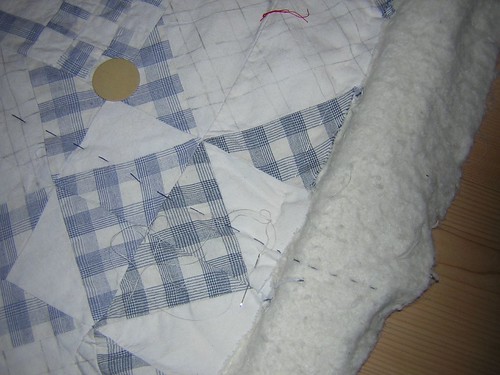
All three layers of your quilt need to be attached to the fabric stips on the poles. The fabric strip should be facing up ( see picture above) and the entire quilt needs to be smooth and flat between the two poles. If you are in doubt do it again otherwise you might regret it when you quilt it in your frame later.
Das gesamte Sandwich (alle drei Schichten des Quilts)
müssen an den Leinen/Stoffstreifen der Stangen befestigt werden. Der Leinen/Stoffstreifen sollte nach oben zeigen (siehe Bild
oben) und das Quiltsandwich sollte glatt und ohne Falten zwischen den beiden
Stangen liegen. Wenn Du Dir nicht ganz
sicher bist, befestige es lieber noch einmal sauber und glatt, sonst bereust Du
es später beim Quilten im Rahmen.
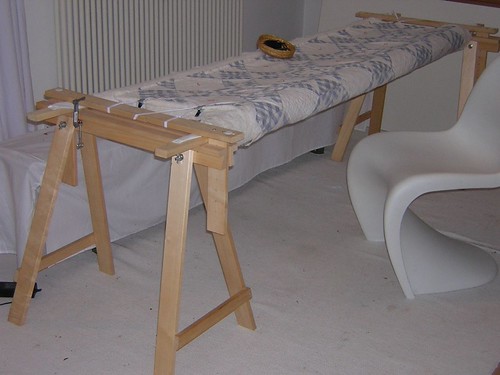
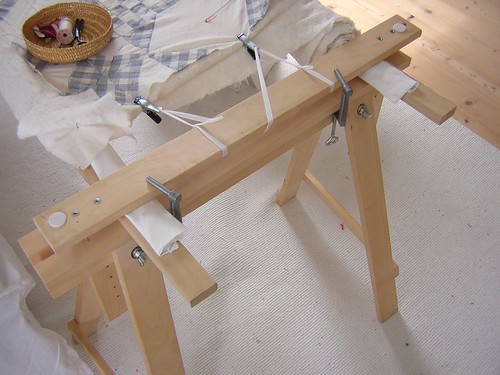
 Roll up the enire quilt on one of the poles and give it a little tension. First, put the “empty” pole between the sidebars of the
 “Vikar Artur” "FINNVARD" table leg (see picture below) and secure it on both ends with a screwclamp. Then roll off just as much of the quilt to barely fit the lenght of “Artur”. Pull it tight and now secure both ends of the second pole with a screwclamp.
Roll den gesamten Quilt jetzt gleichmäßig und ruhig ein bisschen
fester auf einer der Stangen auf. Dann befestige die „leere“ Stange zuerst
zwischen den „Balken“ von Arthur FINNVARDs Tischbein (siehe Bild
unten) und sichere sie mit einer Schraubzwinge an beiden Seiten. Dann einfach
so viel von dem Quilt abrollen das er gerade so bis an die andere Seite von Artur
FINNVARD passt. Ziehe ihn leicht stramm und sicherer nun die beiden Enden
der zweiten Stange ebenfalls mit den Schraubzwingen.
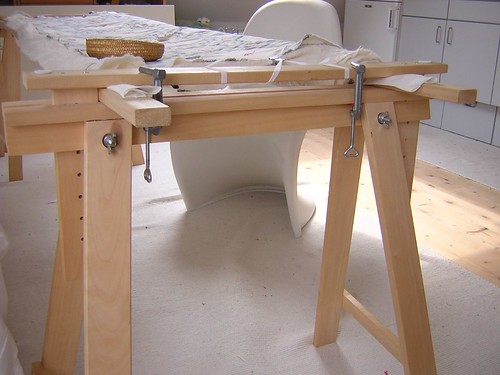 With the “regular” clamps and the string I pulled the sides of my quilt tight (which is optional I think, see if you need to).
Mit den "normalen" Klemmen und dem Stoffband
habe ich die Seiten meines Quilts etwas stramm gezogen (was eher optional ist, einfach selbst beurteilen ob Du
es brauchst).
 When you finished quilting the part of your quilt in the frame just open the screwclamps, roll the finished part on the "empty pole" and put all clamps back on.
Wenn Du den Teil deines
Quilts im Rahmen fertig gequiltet hast, einfach die Schraubzwinen öffnen und
den Quilt entsprechen weiter auf die „leere“ Stange aufrollen und wieder
festklemmen.
Now when I finished the quilt or want to take a longer break I just disassemble the frame. I can put the quilt rolled-up on the poles under my bed and Artur will become my kitchentable again.
Und wenn mein Quilt fertig
gequiltet ist oder ich eine längere Quiltpause einlege, zerlege ich den Rahmen
wieder in seine Einzelteile. Artur FINNVARD wird wieder mein Küchentisch und
die Stangen lege ich unter mein Bett.
When you finished quilting the part of your quilt in the frame just open the screwclamps, roll the finished part on the "empty pole" and put all clamps back on.
Wenn Du den Teil deines
Quilts im Rahmen fertig gequiltet hast, einfach die Schraubzwinen öffnen und
den Quilt entsprechen weiter auf die „leere“ Stange aufrollen und wieder
festklemmen.
Now when I finished the quilt or want to take a longer break I just disassemble the frame. I can put the quilt rolled-up on the poles under my bed and Artur will become my kitchentable again.
Und wenn mein Quilt fertig
gequiltet ist oder ich eine längere Quiltpause einlege, zerlege ich den Rahmen
wieder in seine Einzelteile. Artur FINNVARD wird wieder mein Küchentisch und
die Stangen lege ich unter mein Bett.
 Quiltrahmen von Redwork in Germany steht unter einer Creative Commons Namensnennung-Keine kommerzielle Nutzung-Weitergabe unter gleichen Bedingungen 3.0 Deutschland Lizenz.
This
instruction is almost 10 years old, in the meantime you can find alternative
versions on the web:
Diese Anleitung ist jetzt schon fast zehn Jahre alt, in
der Zwischenzeit gibt es bereits alternative Versionen im Netz:
Other sites with just pictures of finished IKEA Hack quilt frames
for inspiration:
Andere Seiten nur mit Bildern des fertigen Quiltrahmen / Quiltständer IKEA HACKs als Inspiration:


